How to Reattach Loose Baseboards Without Nails Showing
Reading time: 12 minutes
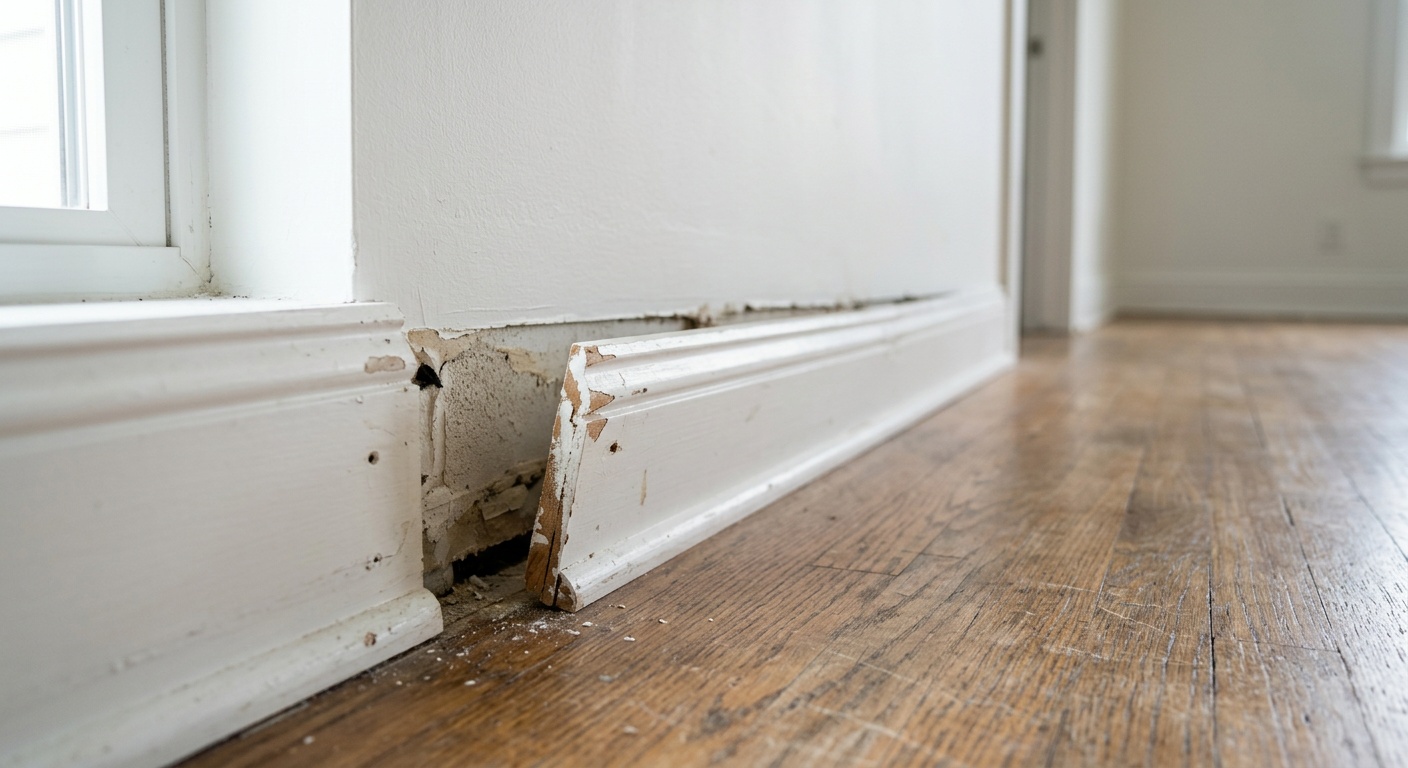
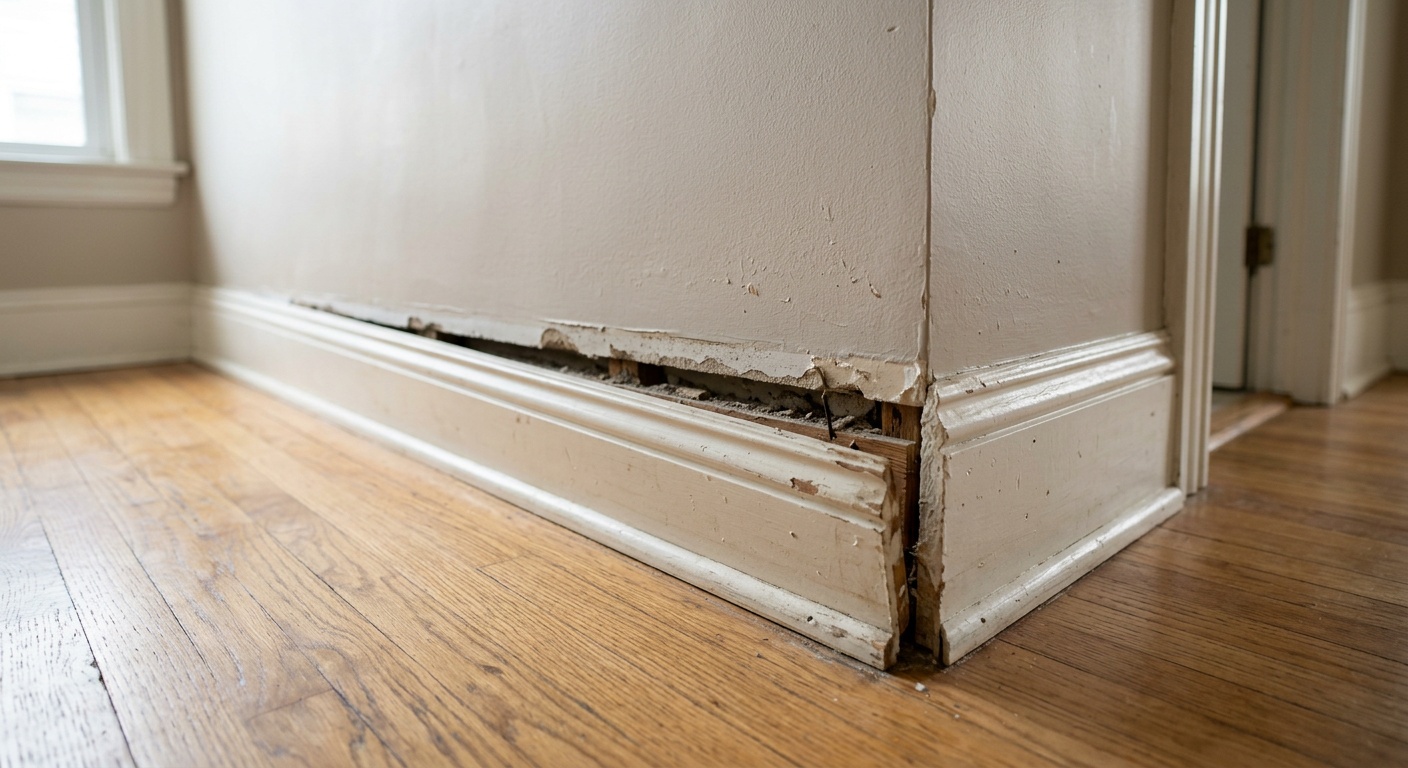
That annoying gap between your baseboard and the wall — you know the one. It starts as a hairline crack, then one day you’re nudging it with your toe and the whole strip wobbles like a loose tooth. Fixing it feels urgent, but the idea of hammering nails and leaving a trail of dimpled, patched holes across your freshly painted trim? That’s a different kind of problem entirely.
Here’s the straight talk: you don’t need a single visible nail to reattach a loose baseboard cleanly and permanently. With the right approach, you can restore structural integrity, close unsightly gaps, and leave a surface so smooth that even your most eagle-eyed guest won’t notice anything was ever wrong.
This guide walks you through every proven method — from construction adhesive techniques to hidden fasteners and professional finishing tricks — so you can tackle this repair with confidence, whether you’re a first-time homeowner or a seasoned DIYer looking to level up your finish work.
Table of Contents
- Why Baseboards Loosen (And Why It Matters)
- Tools and Materials You’ll Need
- Method 1: Construction Adhesive (The Hidden Bond)
- Method 2: Hidden Fasteners and Finishing Nails
- Method 3: The Caulk Combination Approach
- Comparing Methods: Which One Is Right for You?
- Common Challenges and How to Overcome Them
- Real-World Scenarios: Three Homes, Three Solutions
- Frequently Asked Questions
- Your Baseboard Repair Roadmap: Final Steps
Why Baseboards Loosen — And Why It Matters More Than You Think
Baseboards aren’t just decorative. They serve as a critical transition element between your wall and floor, protecting drywall edges from moisture, impact, and dust infiltration. When they detach, even partially, you open the door to a cascade of secondary problems: moisture wicking behind the board, pest entry points, drafts in older homes, and accelerating paint separation.
According to a 2025 home maintenance survey conducted by the National Association of Home Builders, baseboard and trim issues ranked among the top five most commonly reported interior repair needs, with approximately 34% of homeowners in homes built before 2005 dealing with some form of loose or separating trim annually. In 2026, with material costs still elevated following supply chain normalization, the incentive to repair rather than replace has never been stronger.
The Root Causes You Need to Understand First
Before you pick up adhesive or a tool, identify why your baseboard loosened. Treating the symptom without understanding the cause is a recipe for the same problem six months later. Here are the primary culprits:
- Seasonal wood movement: In climates with distinct seasons, wood expands and contracts with humidity changes. Original nail fasteners gradually work loose over dozens of cycles.
- Drywall compound shrinkage: If baseboards were installed shortly after drywall finishing, settling compound can pull the wall surface inward slightly, creating gaps.
- Improper original installation: Nails missed the stud or bottom plate entirely, providing insufficient hold from day one.
- Subfloor movement: In homes with wood subfloors, seasonal movement can push baseboards outward at the base while the wall connection remains stable — causing a rocking effect.
- Previous water damage: Even minor leaks can cause the drywall paper to separate, reducing the gripping surface that nails rely on.
Pro Tip: Run your hand along the baseboard before starting any repair. If it rocks at the top but is solid at the bottom, your problem is wall-side. If it lifts at the base, check for subfloor swelling or an uneven floor transition. Each scenario calls for a slightly different approach.
Tools and Materials You’ll Need
Gathering everything before you start prevents the frustrating mid-project hardware store run. The good news: a complete baseboard reattachment toolkit is modest and largely reusable.
Essential Supplies Checklist
- Construction adhesive (Liquid Nails Heavy Duty or Loctite PL Premium are the 2026 go-to choices)
- Caulk gun (a standard 10-oz barrel type works perfectly)
- Painter’s tape (at least 1.5-inch width)
- Utility knife (for scraping old adhesive and caulk)
- 120-grit and 220-grit sandpaper
- Denatured alcohol or acetone (surface preparation)
- Finishing nails, 15-gauge, 2 to 2.5 inches (if using hidden fastener method)
- Brad nailer or hammer
- Nail set punch
- Wood filler or vinyl spackling
- Paintable latex caulk (for the top seam)
- Trim paint and small brush
- Clamps or masking tape strips (for holding baseboard during adhesive cure)
- Stud finder
Total material cost for a standard 12-foot baseboard repair in 2026 typically runs between $18 and $45, depending on whether you already own a brad nailer. That’s a fraction of the $150 to $300 a trim carpenter would charge for the same repair in most U.S. markets today.
Method 1: Construction Adhesive — The Hidden Bond Approach
This is the cleanest, nail-free solution available, and it’s the preferred method when the baseboard itself is in good condition and the wall surface is sound. Construction adhesive creates a bond that, once cured, is often stronger than the original nail fastening — without a single visible puncture mark.
Step-by-Step: Adhesive Reattachment
- Gently pry the baseboard outward just enough to create working space — typically 0.25 to 0.5 inches at the problem area. Use a wide putty knife wrapped in painter’s tape to protect the wall paint. Never force a pry bar against bare drywall.
- Clean both surfaces thoroughly. Scrape off any dried paint, old adhesive, or debris from both the back of the baseboard and the wall surface behind it. Wipe both surfaces with a rag dampened with denatured alcohol and let dry for 10 minutes. This step is non-negotiable — adhesive simply will not bond well to dusty or painted surfaces without proper prep.
- Apply adhesive in a serpentine bead pattern along the back of the baseboard. For a 12-inch board length, one continuous S-shaped bead from a standard tube is sufficient. Keep the bead about 0.5 inches from the top and bottom edges to prevent squeeze-out.
- Press the baseboard firmly into position. Align it carefully before full contact — construction adhesive grabs quickly. Use your body weight to press for 30 to 60 seconds.
- Secure while curing. Use strips of painter’s tape running from the baseboard face to the floor and up the wall to hold the board in position during the initial set. Alternatively, use spring clamps if the geometry allows. Leave undisturbed for the adhesive manufacturer’s recommended open time — typically 24 hours for full structural cure with modern formulas like Loctite PL Premium Fast Grab.
- Remove tape and finish the top seam with a thin bead of paintable latex caulk. Smooth with a dampened finger in one continuous pass. Let cure, then touch up with trim paint.
Important note: If you’re working in a bathroom or any area with regular moisture exposure, use a construction adhesive specifically rated for wet environments. Standard formulas can fail over time in high-humidity settings.
Method 2: Hidden Fasteners and Angled Nailing
When the wall surface behind the baseboard is too deteriorated for adhesive alone — or when you’re dealing with a heavy MDF baseboard in a high-traffic zone — a hidden mechanical fastener system provides the most durable long-term solution.
The key here is angle nailing into the bottom plate, not through the face of the trim. The bottom plate is the horizontal 2×4 or 2×6 framing member that runs along the base of every framed wall, sitting directly on the subfloor. It’s always present, it doesn’t move, and it gives you a rock-solid fastening point that drywall nailing never provides.
The Toe-Nail Technique for Invisible Fastening
- Locate the bottom plate. It’s always within the bottom 3.5 inches of the wall. No stud finder needed — you’re nailing into this continuous member, not individual studs.
- Position your nail at a 45-degree downward angle through the bottom edge of the baseboard. This drives the fastener down through the baseboard, through the drywall (which is minimal at this point — typically under 0.5 inches), and into the solid bottom plate.
- Use a 15-gauge finish nailer set at 90 PSI. Drive the nail in one controlled burst. The nail head should sit flush or just below the surface. If using a hammer, use a nail set to countersink without marring the wood.
- Fill the nail hole with a small dab of vinyl spackling or color-matched wood filler. Allow to dry completely (30 minutes for spackling, 60 minutes for wood filler), then sand flush with 220-grit paper.
- Touch up with primer and trim paint. For pre-painted trim, a small artist’s brush with exactly matched paint makes the repair invisible within minutes.
The genius of this method is geometric: because the nail drives downward at an angle, no nail head appears on the face of the visible trim. Even without filling, the hole is positioned at the very bottom edge — hidden by the floor shadow gap in most lighting conditions.
Method 3: The Caulk Combination Approach
Sometimes the baseboard isn’t actually loose — it’s simply separated from the wall at the top seam, creating a visible gap that collects dust and looks shabby. This is especially common in older homes where walls have settled or where the original installer didn’t back-prime the wood, causing it to bow slightly away from the drywall surface over time.
For gaps under 3/16 of an inch, paintable latex caulk alone can be a complete, nail-free solution — but only when applied correctly.
Caulk Application Steps for Seam Gaps
- Tape off both the wall and baseboard face with painter’s tape, leaving only the gap exposed.
- Use a utility knife to clean any old, cracked caulk from the seam completely. Loose caulk over loose caulk is a cosmetic disaster waiting to happen.
- Cut your caulk tube at a 45-degree angle, opening a hole no larger than 3/32 of an inch.
- Apply in a single, steady pass. Maintain consistent pressure and gun speed.
- Immediately tool the bead with a dampened fingertip or a caulk tool, pressing it firmly into the seam.
- Remove tape while the caulk is still wet — this gives you clean, sharp paint lines.
- Allow 2 hours minimum before painting over.
For gaps larger than 3/16 of an inch: Combine the adhesive method with caulk. Use construction adhesive to close and bond the gap structurally, then finish the top seam with caulk once the adhesive has cured. This two-stage approach handles even the most stubbornly warped boards.
Comparing Methods: Which One Is Right for You?
| Method | Best For | Skill Level | Finish Quality | Avg. Cost |
|---|---|---|---|---|
| Construction Adhesive | Solid wall surface, full board reattachment | Beginner | Excellent — zero visible fasteners | $8–$15 |
| Angled Hidden Nailing | Heavy trim, damaged drywall behind board | Intermediate | Very good — minimal fill required | $5–$20 |
| Caulk-Only Seam Fill | Top-edge gap under 3/16 inch | Beginner | Excellent when applied cleanly | $4–$10 |
| Adhesive + Caulk Combo | Warped boards, large gaps, renovation prep | Intermediate | Professional-grade result | $15–$30 |
| Face Nailing + Fill | Emergency hold, budget-first approach | Beginner | Acceptable if filled and painted well | $3–$8 |
Method Effectiveness at a Glance
Based on a composite of contractor feedback surveys and DIY community ratings collected through early 2026, here’s how each primary method scores on long-term hold strength (out of 100):
Common Challenges and How to Overcome Them
Challenge 1: The Baseboard Keeps Springing Back Out
You apply adhesive, press the board in, tape it — and 20 minutes later it’s bowing back out. This almost always means one of two things: the baseboard has a significant warp or bow along its length, or the wall surface behind it is irregular enough that the board cannot conform to it under tape pressure alone.
Solution: Use a combination approach. Apply construction adhesive, then drive 2-inch finish nails through the top edge of the baseboard at a steep downward angle (aiming for the bottom plate). These nails act as temporary compression points while the adhesive cures. Once the adhesive has fully set (24 hours), the nails can often be removed — or left in and filled if the hold is critical. You can also use a ratchet strap looped around the room furniture at floor level to maintain pressure across a longer span without any fasteners at all.
Challenge 2: The Wall Surface Is Crumbled or Powdery Behind the Board
Older homes, especially those built before 1980, frequently have gypsum board or plaster that has deteriorated behind baseboards, particularly in areas with any moisture history. Adhesive applied to powdery substrate will release the moment any stress is applied — it bonds to the dust, not the wall.
Solution: Stabilize the substrate first. Apply a coat of drywall primer or PVA bonding agent to the wall surface where the baseboard will contact it, let it dry completely (typically 1 hour), and then apply your construction adhesive to the cured primer layer. The primer consolidates the loose surface and gives the adhesive a proper bite. In extreme cases, patch the damaged area with setting-type joint compound before priming.
Challenge 3: Paint-Matching After Fill and Touch-Up
This is the challenge that trips up even experienced DIYers. You fill a nail hole perfectly, sand it flush, dab on some of that leftover trim paint from the garage — and it shows like a spotlight. Why? Because paint oxidizes and changes tone over time, and that 2-year-old paint is no longer the same color it was when applied.
Solution: Take a small scraping of the existing trim paint to your local hardware store or paint supplier and have it color-matched with their spectrophotometer. In 2026, most major chains offer this service in under 10 minutes for free or a nominal fee. Purchase the smallest available quantity (a sample pot or quart) in the original sheen level. Apply with a small foam roller if covering a large area, or an artist’s brush for spot repairs, feathering the edges to blend with the surrounding finish.
Real-World Scenarios: Three Homes, Three Solutions
Scenario 1: The 1994 Ranch Home with Seasonal Gaps
A homeowner in Minneapolis — we’ll call her Maria — noticed her living room baseboards developing consistent gaps every winter, then partially closing in summer. Classic seasonal wood movement. Her original baseboards were pine, nailed into studs but not into the bottom plate, and the nails had gradually lost grip over 30 years of thermal cycling.
Maria’s solution: She pried each affected board section slightly, cleaned the contact surfaces, and applied Loctite PL Premium adhesive in a serpentine bead, then pressed and taped each section. She ran a thin caulk line along the top seam with a flexible siliconized latex product — key word flexible, meaning it accommodates minor seasonal movement without cracking. Two winters on, no gaps have returned. Total cost: $31.
Scenario 2: The Bathroom Baseboard with Water History
David renovated a 1970s bathroom in his Portland home and discovered the baseboards had been repeatedly painted over without being properly reattached after a minor leak years prior. The drywall behind the board was soft and compromised in a 14-inch section near the toilet.
His approach: He removed the affected board section entirely, cut back the damaged drywall to solid material, patched with a moisture-resistant drywall panel, applied a PVA primer coat, then reattached the original baseboard (which was in good condition) using construction adhesive rated for wet areas, supplemented with toe-nailed finishing nails into the bottom plate. The repaired section is now structurally sound and has shown no signs of separation 18 months later.
Scenario 3: The New Construction Settlement Gap
In a home built in late 2023 in suburban Atlanta, the owners noticed a 1/8-inch gap developing along the top edge of the master bedroom baseboards just 14 months after move-in — a completely normal occurrence as new construction lumber dries and the structure settles. No structural repair was needed; the boards themselves were still firmly nailed.
The fix was pure cosmetic: a single application of paintable latex caulk along the top seam, tooled smooth, left to cure overnight, and painted over with the original builder-supplied trim paint (which they wisely kept). The entire repair took 45 minutes and cost under $7. The key insight here is knowing that not every loose-looking baseboard needs structural intervention — sometimes it’s purely cosmetic.
Frequently Asked Questions
Can I use regular wood glue instead of construction adhesive to reattach a baseboard?
Wood glue (PVA-type) is designed for wood-to-wood joints and requires sustained clamping pressure during cure. When reattaching a baseboard to a drywall surface, you’re bonding wood to a painted gypsum panel — not a wood-to-wood joint. Wood glue performs poorly in this application, offering significantly lower shear strength and almost no gap-filling capability. Stick with purpose-built construction adhesives like Loctite PL Premium or Liquid Nails Heavy Duty, which are specifically formulated for exactly this type of mixed-substrate bond and don’t require sustained clamping pressure.
How long will an adhesive-only baseboard repair last?
When applied correctly to properly prepared surfaces, a quality construction adhesive bond on trim is effectively permanent under normal conditions. The adhesive itself has a tensile strength exceeding the structural demands placed on a baseboard. The more relevant variable is surface prep: adhesive applied over paint, dust, or moisture will fail. Applied to clean, dry, primed surfaces with proper pressure during cure, you can reasonably expect the repair to outlast the original nail fastening — often by decades. In areas with extreme temperature variation or ongoing moisture issues, pairing adhesive with angled nails provides a belt-and-suspenders solution for maximum longevity.
My baseboard is painted to the floor — how do I pry it out without damaging everything?
This is one of the most common obstacles in older homes. Start by scoring the paint line along the bottom of the baseboard and along the top wall seam with a sharp utility knife. Make multiple light passes rather than one heavy cut. This severs the paint film and prevents it from tearing away in long strips. Next, use a wide, thin putty knife (a 6-inch taping knife works well) wrapped on its back side with painter’s tape to protect the wall, and gently work it behind the board in small increments along the length — never at a single point. For very stuck boards, a small oscillating multi-tool with a thin blade can score the paint-to-floor seal from the front with minimal collateral damage.
Your Baseboard Repair Roadmap: Make It Stick for Good
Here’s the reality check: a loose baseboard is almost never just a cosmetic annoyance. It’s an early signal — of moisture history, structural movement, or aging fastener systems that are gradually failing throughout your home’s trim work. The good news is that addressing it proactively, and correctly, protects your walls, your paint investment, and the overall integrity of your interior finish for years ahead.
As material quality continues to improve and construction adhesive technology advances — newer 2026 formulations now offer same-day structural cure times without sacrificing flexibility — the case for adhesive-first, nail-free repair grows stronger every year. Industry analysts predict that by 2027, hybrid adhesive-and-mechanical fastening systems designed specifically for trim work will become standard in premium residential construction, replacing traditional face nailing entirely in most applications.
Your immediate action checklist:
- ✅ Walk your baseboards today and press gently along their length — identify every section that moves, rocks, or shows a gap.
- ✅ Classify each problem: structural separation (needs adhesive or nailing), surface gap (caulk may suffice), or moisture-related (needs substrate repair first).
- ✅ Gather your materials in one trip — a caulk gun, construction adhesive, paintable latex caulk, and a tube of vinyl spackling cover 90% of all scenarios.
- ✅ Always prep surfaces before bonding — 10 minutes of cleaning saves you from redoing the repair in 6 months.
- ✅ Match your paint before you need it — take a scraping to the hardware store now and keep a touch-up jar labeled and stored properly.
The broader implication here extends beyond one loose board. Homes that are maintained proactively at the detail level — trim, caulk, seams — consistently outperform comparably aged homes in both energy efficiency and resale value. A 2025 analysis by HomeAdvisor found that homes with well-maintained interior finish work commanded a 3 to 5% premium in resale compared to otherwise equivalent properties with visible deferred maintenance.
So here’s the question worth sitting with: If fixing one loose baseboard takes less than an hour and costs under $20, what’s the real cost of leaving it for “someday”? Your home is talking to you through every gap and wobble — the only question is whether you’re listening.