Weatherstripping a Front Door to Stop Cold Drafts Efficiently
Reading time: 12 minutes
Ever pressed your hand against the bottom of your front door on a frigid January morning and felt a cold river of air rushing in? You’re not alone. Millions of homeowners across North America and Europe lose significant amounts of heat—and money—through poorly sealed front doors every single winter. The good news? This is one of the most fixable problems in home energy efficiency, and you don’t need to be a contractor to solve it.
In 2026, with energy costs remaining elevated and sustainability a growing priority, weatherstripping your front door has evolved from a weekend DIY project into a genuinely smart financial and environmental decision. According to the U.S. Department of Energy’s 2025 residential energy efficiency report, drafty doors and windows account for 25 to 30 percent of a home’s total heating and cooling loss. That’s not a small number—that’s a quarter of your energy bill disappearing into thin air, literally.
This guide cuts through the noise and gives you a precise, practical roadmap for weatherstripping your front door correctly, efficiently, and for the long term.
Table of Contents
- Why Weatherstripping Matters More Than Ever in 2026
- Diagnosing Your Draft Problem
- Types of Weatherstripping: Choosing the Right One
- Tools and Materials You’ll Need
- Step-by-Step Installation Guide
- Common Challenges and How to Overcome Them
- Cost vs. Savings: Is It Worth It?
- Frequently Asked Questions
- Seal the Deal: Your Action Plan
Why Weatherstripping Matters More Than Ever in 2026
Let’s be direct: energy costs aren’t retreating anytime soon. In early 2026, the U.S. Energy Information Administration reported that average household heating bills remain 18 percent higher than pre-2022 baselines, driven by persistent supply chain adjustments and infrastructure investment costs. In Canada and the UK, the numbers are similarly sobering.
But the problem isn’t just about money. Drafty doors create comfort inconsistencies—those annoying cold zones near your entryway that make your thermostat work overtime. They also contribute to moisture infiltration, which can lead to mold, wood warping, and compromised door frames over time.
Here’s a quick scenario to put it in perspective: Imagine you have a gap of just 1/8 of an inch running along the bottom of your front door. That gap is equivalent to leaving a 2.4-inch diameter hole in your wall, according to the Building Performance Institute’s 2025 field study. Now multiply that by a drafty door frame and a worn threshold seal—suddenly you’re looking at a meaningful thermal breach that your heating system is constantly fighting against.
Weatherstripping addresses this problem at its root. It’s not a bandage solution—when done correctly, a proper weatherstrip installation can last 5 to 10 years and deliver consistent energy savings from day one.
Diagnosing Your Draft Problem
The Simple Home Draft Test
Before you buy a single roll of weatherstripping, you need to know exactly where your cold air is coming from. Many homeowners make the mistake of replacing all the weatherstripping when only one section is the real culprit. Here’s how to diagnose accurately:
- The Candle or Incense Test: On a windy day, hold a lit candle or incense stick near the door edges, the bottom threshold, and the lock area. Watch for flickering or smoke movement—this indicates air infiltration.
- The Flashlight Test: At night, have someone shine a bright flashlight around the door perimeter from outside while you observe from inside. Light penetration reveals gaps.
- The Paper Test: Place a sheet of paper between the door and the frame, then close the door. If you can pull the paper out easily without resistance, the seal at that point is inadequate.
- Thermal Imaging: For the most precise diagnosis, a basic infrared thermometer or smartphone thermal camera attachment (widely available in 2026 for under $50) will show you cold spots in vivid color contrast.
Understanding Where Drafts Hide
Drafts on a front door typically originate from four zones, each requiring a slightly different solution:
- The top of the door (header): Often overlooked, the top seal degrades from repeated door slams and temperature fluctuations.
- The side jambs (left and right edges): The most common failure points, especially on older doors that have settled or warped slightly.
- The bottom gap: The largest and most impactful source of cold air infiltration—typically addressed with a door sweep or threshold seal.
- The lock area and keyhole: Small but meaningful, especially on older hardware. A lock cover plate can address the keyhole specifically.
Pro Tip: Document your findings before purchasing materials. Take photos of each problem area and note whether the gap is consistent or only appears when the door is in a specific position (some doors shift with seasonal humidity changes).
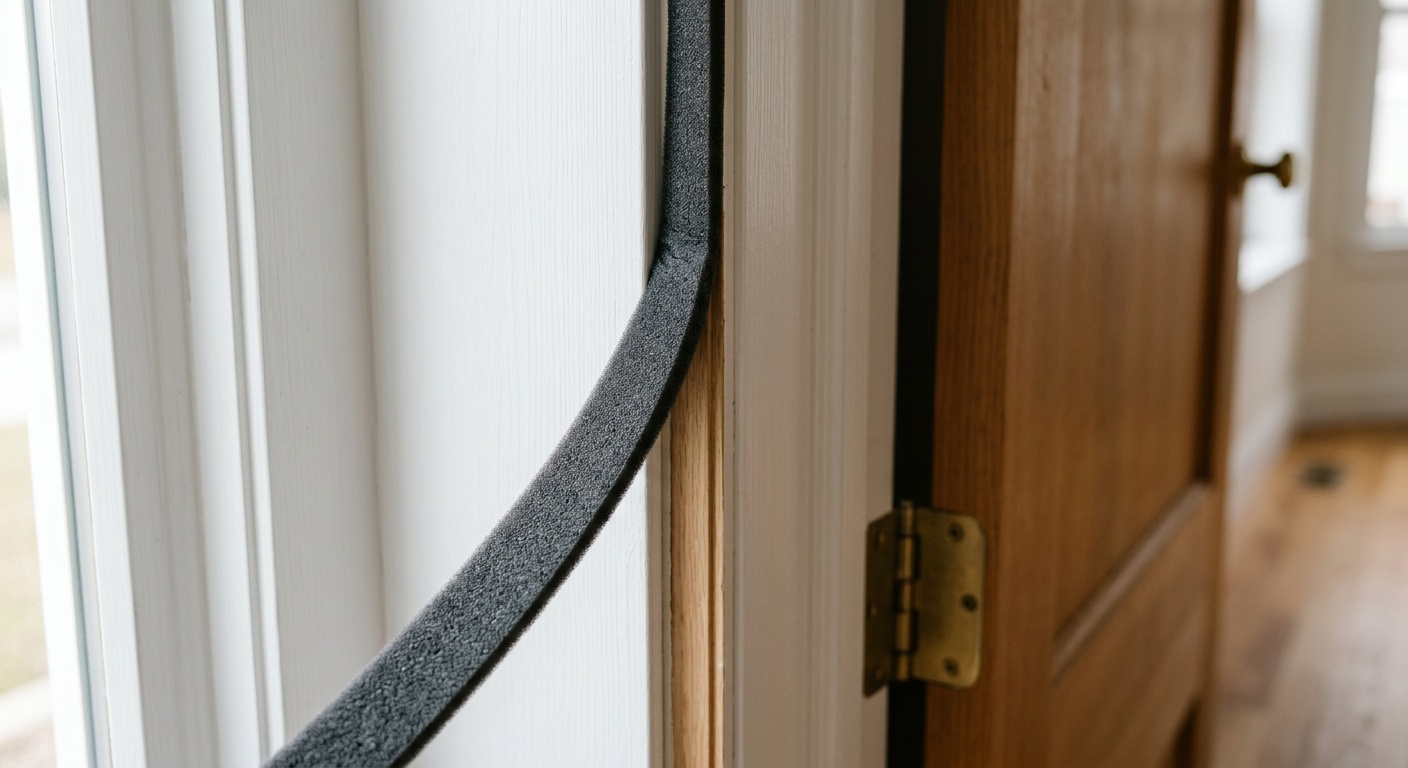
Types of Weatherstripping: Choosing the Right One
Not all weatherstripping is created equal. Using the wrong type for a specific location is one of the most common DIY mistakes—it leads to poor sealing, premature wear, and frustration. Here’s a breakdown of your main options:
Comparing Weatherstripping Materials
| Type | Best Location | Durability | Cost (2026 avg.) | DIY Difficulty |
|---|---|---|---|---|
| Foam Tape (self-adhesive) | Top & side jambs | 2–4 years | $5–$15 | Very Easy |
| V-Strip (tension seal) | Side jambs | 5–10 years | $10–$25 | Easy–Moderate |
| Door Sweep (brush or rubber) | Door bottom | 3–7 years | $15–$40 | Easy |
| Door Threshold Seal | Door bottom/floor | 7–12 years | $30–$80 | Moderate |
| Magnetic Weatherstrip | Full perimeter | 10–15 years | $50–$120 | Moderate–Hard |
For most front doors, the most effective combination is V-strip weatherstripping on the side jambs, foam or rubber compression strip on the top, and a door sweep or threshold seal at the bottom. This addresses all four draft zones comprehensively.
In 2026, a newer category of hybrid silicone-foam weatherstripping has become increasingly popular for its durability and superior compression recovery—meaning it bounces back to its original shape better than traditional foam after repeated door closings. Brands like Pemko, M-D Building Products, and Duck Brand have all introduced upgraded silicone-blend options that outperform older materials in cold-climate testing.
Tools and Materials You’ll Need
One of the best things about weatherstripping a front door is that the tool list is short and inexpensive. Here’s what you’ll need:
- Tape measure (measure all four sides of your door opening)
- Utility knife or scissors (for cutting weatherstrip to length)
- Flathead screwdriver (for removing old weatherstripping)
- Hammer and finishing nails (if using nail-on strip types)
- Electric drill (for door sweep installation)
- Cleaning cloths and rubbing alcohol (essential for surface prep before adhesive strips)
- Caulk gun and weatherproof caulk (for sealing gaps in the door frame itself)
- Your chosen weatherstripping materials (based on your diagnosis)
Total tool and material cost for a full front door weatherstrip job in 2026 typically ranges from $25 to $90, depending on the materials chosen.
Step-by-Step Installation Guide
Step 1: Remove Old Weatherstripping Completely
This step is non-negotiable. Many DIYers try to layer new weatherstripping over old, degraded material—this leads to uneven compression, poor sealing, and adhesive failure. Use a flathead screwdriver or putty knife to peel or pry away all existing weatherstripping from the door frame and door bottom. If there’s old adhesive residue, clean it thoroughly with rubbing alcohol and allow the surface to dry completely (at least 30 minutes in cool weather).
Step 2: Measure All Four Door Sides
Measure the top of the door frame, both side jambs, and the width of the door at the bottom. Write down each measurement separately—don’t assume opposite sides are equal. Older homes especially can have door frames that have shifted and are no longer perfectly square. Add 2–3 inches to each measurement before cutting to give yourself working room, then trim to fit precisely.
Step 3: Install Side Jamb Weatherstripping (V-Strip)
V-strip (also called tension seal weatherstripping) is ideal for the sides because it compresses and expands dynamically as the door opens and closes. Here’s the process:
- Cut your V-strip to the exact height of each side jamb.
- Open the door and position the strip inside the door stop channel, with the open side of the V facing the outside.
- For self-adhesive versions: peel the backing and press firmly from top to bottom, working out air bubbles.
- For nail-on versions: use a hammer and finishing nails every 2 inches along the strip.
- Close the door and check for even compression—you should feel gentle resistance but the door should close fully without forcing.
Step 4: Install Top Door Frame Weatherstripping
The top frame (header) is typically the easiest section. Foam or rubber compression tape works well here because the door pushes upward into it minimally. Cut to length, clean the surface, peel the adhesive backing, and press into place along the door stop of the top frame. Ensure the strip contacts the door evenly across its entire width when closed.
Step 5: Install the Door Sweep or Threshold Seal
This is the most impactful step. For a door sweep:
- Close the door and measure the width precisely.
- Cut the sweep to length (most come with a hacksaw-friendly aluminum carrier).
- Position the sweep against the inside face of the door bottom so the rubber or brush element just grazes the threshold—not dragging heavily, but making firm contact.
- Mark the screw holes, pre-drill if needed, and fasten with the provided screws.
- Test by sliding a piece of paper under the closed door—you should feel resistance across the full width.
For a threshold seal replacement (a more involved but longer-lasting option), the existing threshold may need to be unscrewed and replaced with a new adjustable model that includes a vinyl bulb or rubber seal that rises to meet the door bottom.
Step 6: Seal the Frame Itself (If Needed)
If your draft diagnosis revealed gaps in the door frame—not just between the door and frame—use exterior-grade weatherproof caulk to fill those gaps before installing new weatherstripping. Pay particular attention to where the door frame meets the exterior wall cladding or interior trim. This supplemental step can make a dramatic difference in especially old or settled homes.
Step 7: Test and Fine-Tune
After installation, perform all three draft tests again (candle, flashlight, paper). Walk around the closed door feeling for cold air. If you still detect a draft in one spot, adjust the weatherstripping positioning or add a supplemental layer. Don’t settle for “mostly sealed”—the goal is a consistent, complete seal across all four sides.
Common Challenges and How to Overcome Them
Challenge 1: Door Won’t Close Properly After Installation
This is the most frequent complaint after DIY weatherstripping. The cause is almost always weatherstripping that is too thick or positioned too far into the door opening. Solution: For compression-type strips, choose a slightly thinner profile or reposition the strip marginally further from the door edge so it compresses more when the door closes. V-strips are forgiving here—they flex rather than block. Remember, you want resistance, not obstruction.
Challenge 2: Adhesive Fails in Cold Weather
Self-adhesive weatherstripping is notorious for failing when applied in temperatures below 50°F (10°C). In 2026, many homeowners in northern climates are applying strips during autumn prep, but then the adhesive releases in January when temperatures drop sharply. Solution: Always apply adhesive weatherstripping when the temperature is above 50°F and the surface is completely dry. If you must install in cold weather, warm the door surface with a heat gun first (carefully, for wood doors), or use a contact cement adhesive separately for reinforcement. For best results in extreme climates, opt for nail-on or screw-mounted weatherstripping over adhesive-only options.
Challenge 3: Uneven or Warped Door Creates Inconsistent Gaps
Wood doors—especially in older homes—warp seasonally due to humidity and temperature changes. A door that sealed well in autumn may have visible gaps in midwinter. Solution: First, consider adjusting or shimming the door hinges to correct the warping if it’s moderate. For persistent warping, an adjustable threshold and foam compression strip (which accommodates variable gaps better than rigid types) offers the best results. In severe cases, a magnetic weatherstrip system’s strong compression can bridge gaps that other types can’t.
Cost vs. Savings: Is It Worth It?
Let’s talk numbers, because this is where weatherstripping goes from a “nice-to-have” to a genuinely compelling investment.
According to the ENERGY STAR program’s 2025–2026 data, homeowners who properly seal all drafts around doors and windows save an average of $180 to $320 per year on heating and cooling costs. A full front door weatherstripping job with quality materials typically costs $30 to $90 in materials and 2–3 hours of your time. That’s a payback period of less than two months—an ROI that most financial investments can’t match.
Here’s a visual breakdown of energy savings impact by weatherstripping zone:
Energy Savings Impact by Door Sealing Zone
Source: Building Performance Institute Field Study, 2025
The data makes the priority clear: always tackle the door bottom first—it delivers the greatest immediate impact. A $25 door sweep can eliminate nearly half of your front door’s total draft problem in under an hour.
Real-World Example: A Minneapolis Homeowner in 2025
Sarah, a homeowner in Minneapolis, Minnesota, noticed her heating bills had climbed to an average of $310 per month in the winter of 2024–2025. After performing a candle test, she discovered significant drafts at the bottom of her front door and along the left side jamb. She spent $67 total on a combination door sweep and V-strip kit, installed them over one afternoon, and saw her January 2026 heating bill drop to $248—a $62 monthly saving, or roughly $186 over the three coldest months. Her materials paid for themselves in just over a month.
Real-World Example: A London Flat Renovation in 2026
In contrast, James renovating a Victorian-era flat in East London faced a more complex challenge: a period front door that was slightly warped and had gaps varying from 2mm to 8mm around the frame. Rather than replacing the door (quoted at £800+), he invested £95 in a magnetic weatherstripping system with adjustable compression designed for irregular gaps. The result was a dramatically quieter, warmer entryway and a measurable reduction in his heat pump’s runtime hours. His energy provider’s smart meter confirmed a 19% reduction in heating energy use for the flat’s ground-floor zone within the first four weeks.
Frequently Asked Questions
How long does weatherstripping a front door take for a beginner?
For most homeowners tackling this for the first time, a complete front door weatherstripping job—including removing old material, surface prep, and installing new strips on all four sides plus a door sweep—takes approximately 2 to 4 hours. The variation depends on the door’s current condition and the type of weatherstripping chosen. Adhesive foam strips are the fastest to install; nail-on or screw-mounted systems take longer but deliver better long-term results. Breaking the job into two sessions (diagnosis and prep on day one, installation on day two) often yields better results than rushing it in a single sitting.
Can I weatherstrip a door myself, or should I hire a professional?
In the vast majority of cases, weatherstripping a front door is comfortably within DIY territory—even for people without prior home improvement experience. The materials are designed for homeowner installation, tools are minimal, and the process is forgiving of imperfection. Professional installation makes sense in specific scenarios: when the door frame itself needs structural repair, when the door has warped significantly and requires adjustment or planing, or when you’re installing a high-end magnetic system on a complex door configuration. For a standard residential front door, DIY is the recommended approach in 2026—it saves $150–$400 in labor costs and gives you direct familiarity with the installation for future maintenance.
How often should front door weatherstripping be replaced?
The lifespan varies significantly by material: foam tape typically needs replacement every 2 to 4 years, rubber and vinyl compression strips last 4 to 7 years, and quality V-strip or silicone-hybrid weatherstripping can perform well for 7 to 12 years. Rather than replacing on a fixed schedule, inspect your weatherstripping each autumn before heating season. Look for visible cracking, compression failure (the strip no longer bounces back after being pressed), or tearing. Perform the candle test annually. In climates with extreme temperature swings or high UV exposure, inspect semi-annually. The good news: early replacement is inexpensive and takes under an hour once you’re familiar with the process.
Seal the Deal: Your Front Door Action Plan
You now have everything you need to stop cold drafts from winning the battle against your comfort and your wallet. Here’s your immediate action plan—practical, sequenced, and built for real results:
- This weekend: Perform a full draft diagnosis. Use the candle test, flashlight test, and paper test on all four sides of your front door. Document every gap with photos and notes on gap width.
- Within the week: Buy the right materials. Based on your findings, select V-strip for the jambs, compression tape for the top, and a door sweep or threshold seal for the bottom. Budget $30–$90 total for quality materials.
- Installation day: Remove everything old first. Clean all surfaces with rubbing alcohol, let dry completely, then install new weatherstripping zone by zone—bottom, sides, then top.
- Test thoroughly before considering the job done. Re-run all three draft tests after installation. Fine-tune any sections where gaps persist. The goal is a complete seal, not a partial improvement.
- Schedule an annual check-in each October. Set a calendar reminder so this never slips. Catching early degradation keeps your seal tight year after year with minimal effort.
As homes become smarter and energy efficiency becomes a standard expectation rather than a premium feature, air sealing is increasingly recognized as the foundational layer of any home performance upgrade—before insulation additions, before heat pump installations, before smart thermostat optimization. You can’t efficiently heat a sieve, no matter how advanced your systems are.
Here’s the straight talk: weatherstripping your front door is one of the highest-ROI actions you can take as a homeowner in 2026. It’s affordable, achievable in a single afternoon, and delivers measurable comfort improvements from the very first cold night after you’re done. You now know exactly what to do—so when that next blast of cold air sneaks through your front door, will you let it win, or will you finally seal the deal?