Step-by-Step Guide to Fixing a Running Toilet Yourself
Reading time: 14 minutes
Ever walked past your bathroom at 2 a.m. and heard that relentless hissing sound coming from the toilet tank? You’re not alone. A running toilet is one of the most common — and most wasteful — household plumbing problems homeowners face. The good news? You don’t need a plumber on speed dial or a degree in engineering to fix it.
Here’s the straight talk: most running toilet repairs take under 30 minutes and cost less than $20 in parts. Yet in 2026, the average American household still calls a licensed plumber for this exact issue, spending anywhere between $150 and $400 for a job anyone with basic mechanical aptitude can handle on a Sunday afternoon.
This guide is your practical roadmap — from diagnosing the exact cause of your running toilet to replacing the faulty components with confidence. Whether you’re a first-time homeowner or someone who’s been meaning to tackle this for months, let’s turn that dripping drain on your water bill into a victory for your wallet and the environment.
Table of Contents
- Why a Running Toilet Matters More Than You Think
- How a Toilet Tank Actually Works
- Diagnosing the Problem: What’s Causing the Running?
- Tools and Parts You’ll Need
- Step-by-Step Repair Instructions
- Common Challenges and How to Overcome Them
- Prevention: Keeping Your Toilet Running Smoothly
- Frequently Asked Questions
- Your Toilet Fix Checklist: Time to Take Action
Why a Running Toilet Matters More Than You Think
Let’s start with the numbers, because they’re genuinely alarming. According to the U.S. Environmental Protection Agency (EPA), a single running toilet can waste up to 200 gallons of water per day. Over the course of a month, that’s 6,000 gallons — enough to fill a small above-ground swimming pool. In 2026, with water utility rates having increased by an average of 8.3% compared to 2024 levels in most metropolitan areas, that translates directly into a bloated water bill you simply don’t need.
Consider this real-world scenario: Maria, a homeowner in Phoenix, Arizona, noticed her water bill had jumped from $65/month to $112/month over the summer of 2025. After calling her utility provider and checking for leaks, she discovered her upstairs toilet had a worn flapper valve — a part that costs $6 at any hardware store. One 20-minute repair saved her nearly $600 annually.
Beyond the financial impact, water conservation is increasingly critical. The Western United States entered its third consecutive year of drought conditions in 2026, and municipalities across California, Nevada, and Arizona have introduced tiered penalty pricing for excessive household water use. Fixing a running toilet isn’t just good for your wallet — it’s a responsible environmental choice.
The Real Cost Breakdown
| Scenario | Water Wasted/Month | Estimated Monthly Cost | DIY Fix Cost | Annual Savings |
|---|---|---|---|---|
| Worn Flapper Valve | 2,000–4,000 gal | $18–$35 | $5–$10 | $200–$420 |
| Faulty Fill Valve | 3,000–6,000 gal | $26–$52 | $10–$20 | $300–$620 |
| Broken Float Ball/Arm | 1,500–3,000 gal | $13–$26 | $8–$15 | $150–$312 |
| Hiring a Plumber (All Issues) | N/A | N/A | $150–$400 | $0 saved on repair |
| Full DIY Rebuild Kit | N/A | N/A | $18–$30 | $400–$800+ |
How a Toilet Tank Actually Works
Before you can fix something, you need to understand how it functions. The good news is that toilet tank mechanics are surprisingly straightforward — essentially a system of water control that’s been relatively unchanged since the mid-20th century.
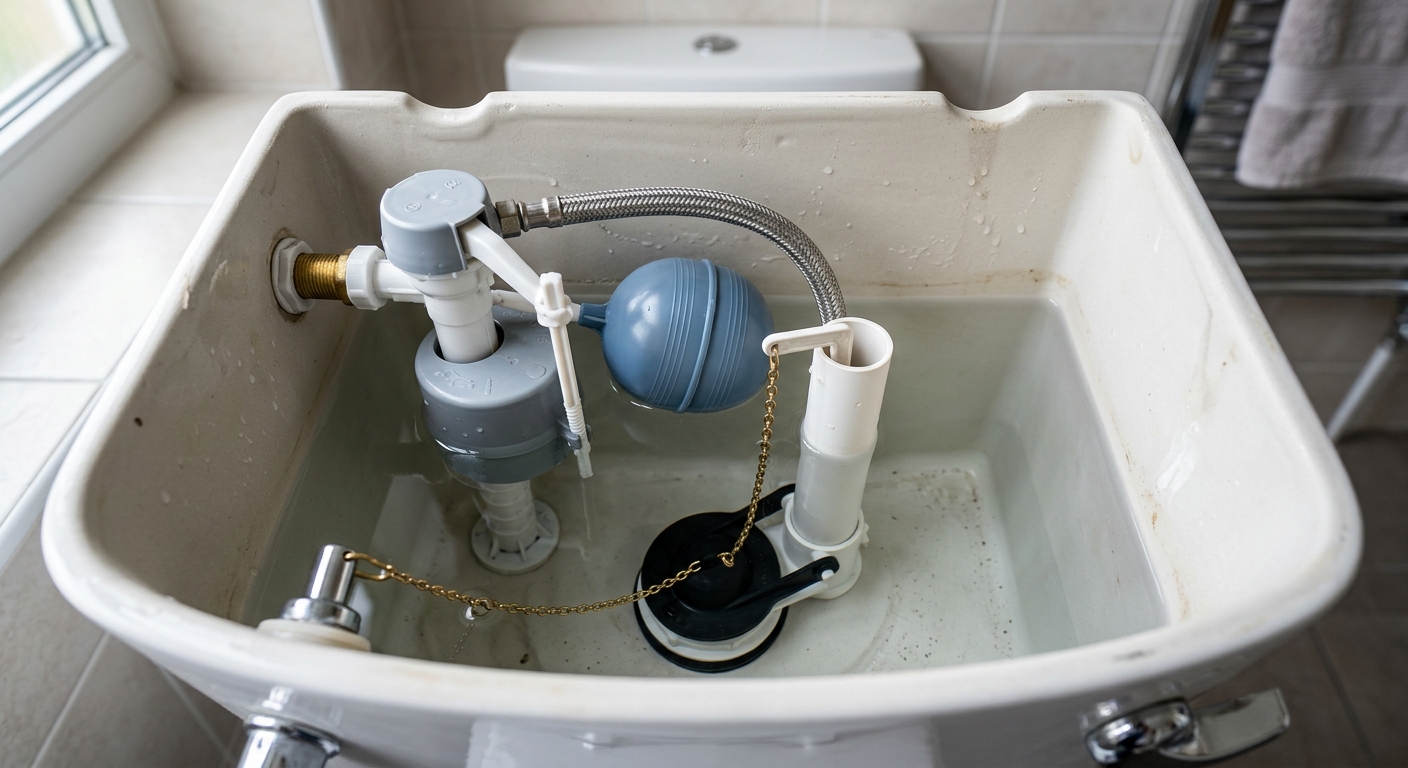
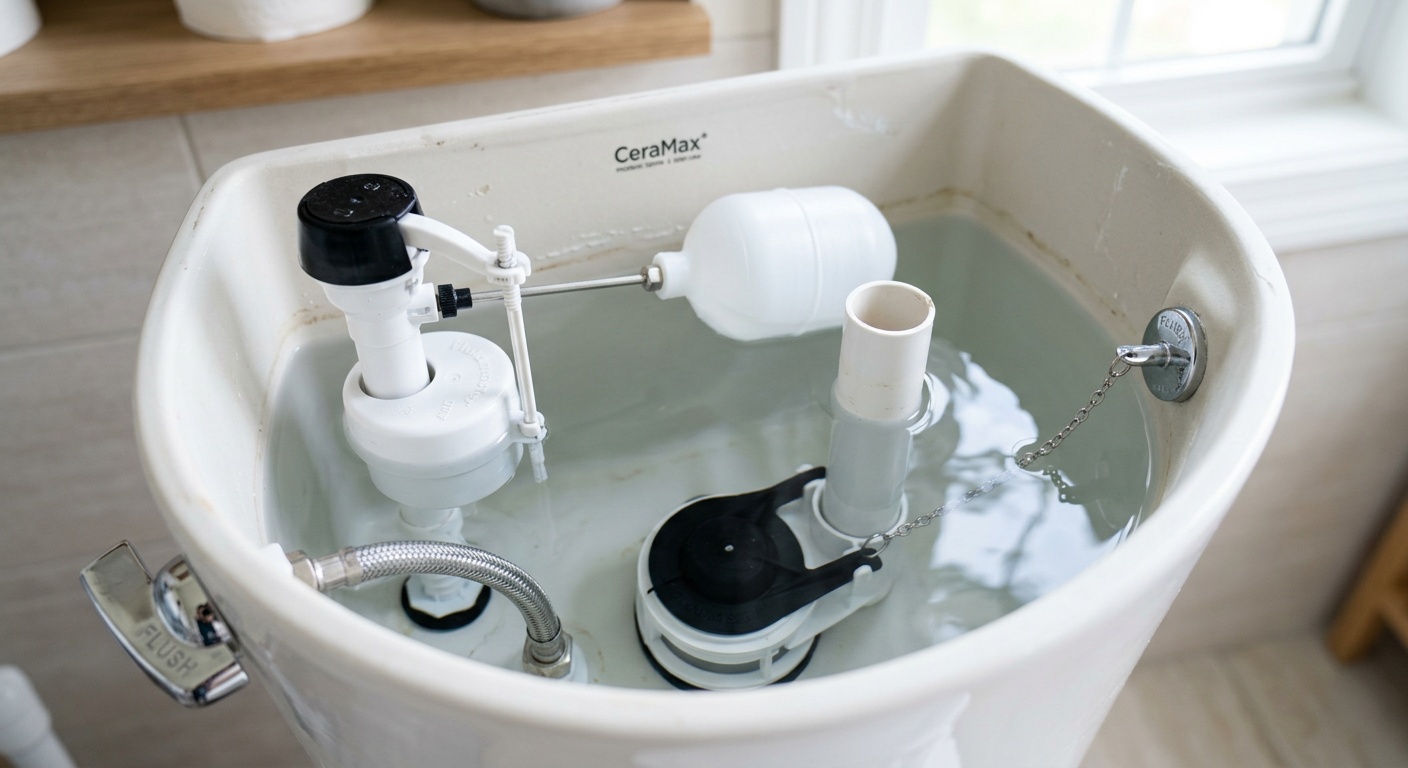
When you flush, the flush handle lifts a chain connected to the flapper valve (or flush valve seal) at the bottom of the tank. The flapper rises, water rushes into the bowl, and gravity does the rest. Once the tank empties, the flapper drops back down to seal the drain opening. Meanwhile, the fill valve (also called a ballcock) detects the drop in water level and begins refilling the tank. A float — either a ball on an arm or a cup float on the fill valve itself — rises with the water level until it reaches the set point, at which moment it signals the fill valve to shut off.
The overflow tube is your tank’s safety valve. If water rises above this tube, it drains directly into the bowl to prevent overflow. This is why you’ll sometimes hear water running into the bowl without anything triggering a flush — the water level is simply too high.
The Three Main Culprits of a Running Toilet
In virtually every case of a running toilet, the problem traces back to one of three components:
- The Flapper: Worn, warped, or coated with mineral deposits that prevent a tight seal.
- The Fill Valve: Worn or misadjusted, causing constant water flow or slow refill cycles.
- The Float: Set too high, causing water to spill into the overflow tube and continually drain.
Identifying which component is failing determines your exact repair path — and it takes less than five minutes to figure out.
Diagnosing the Problem: What’s Causing the Running?
Diagnosis is everything. Replacing the wrong part wastes your time and money. Here’s a simple, reliable diagnostic process used by professional plumbers — adapted for the DIY homeowner.
The Dye Test: Your First Step
Start with the dye test to determine whether water is leaking from the tank into the bowl (a sign of a faulty flapper). Drop a few tablets of food coloring or a dye tablet (often free at water utility offices) into the tank — not the bowl. Wait 10–15 minutes without flushing. If colored water appears in the bowl, your flapper is leaking. This is the most common cause of running toilets, accounting for approximately 65% of all cases according to the American Society of Plumbing Engineers’ 2025 residential plumbing survey.
Diagnostic Checklist
- Remove the tank lid and set it safely aside on a towel.
- Observe the water level. Is it above the top of the overflow tube? If yes, your float is set too high or your fill valve is faulty.
- Listen carefully. Do you hear a hissing sound even when the tank is full? That points to the fill valve.
- Press down on the flapper with your finger while the toilet is running. If the sound stops, you’ve confirmed a worn flapper.
- Jiggle the float arm (if present). If the running stops temporarily, the float needs adjustment.
Quick Scenario: Imagine you remove the tank lid and see water trickling over the top of the overflow tube. You don’t need the dye test — the float is clearly set too high, and that’s your fix. Simple adjustment, zero parts cost.
Tools and Parts You’ll Need
One of the great advantages of toilet repair is the minimal toolkit required. Here’s your complete shopping list before you start:
Essential Tools
- Adjustable wrench or slip-joint pliers
- Flathead and Phillips screwdrivers
- Sponge and small bucket
- Towels or old rags
- Rubber gloves (optional but recommended)
Replacement Parts (Based on Diagnosis)
- Flapper valve — $5–$10 (bring your old one to the hardware store to match size and brand)
- Fill valve assembly — $10–$20 (Fluidmaster 400A is the 2026 industry standard, compatible with 95% of toilets)
- Float ball — $5–$8 (for older ballcock-style systems)
- Complete toilet repair kit — $18–$30 (includes flapper, fill valve, and float; ideal for older toilets)
Pro Tip: In 2026, most hardware chains like Home Depot and Lowe’s carry toilet repair kits with QR-coded instructions that link to brand-specific tutorial videos. If you’re unsure about your toilet brand, photograph the inside of your tank before heading to the store — it’ll save you an extra trip.
Step-by-Step Repair Instructions
Now we get to the heart of it. Follow these instructions based on your diagnosis. If you’re unsure or your toilet shows signs of multiple issues, start with the flapper (cheapest fix) and work your way up.
Repair 1: Replacing the Flapper Valve
This is the most common fix and takes about 10 minutes from start to finish.
- Turn off the water supply. Locate the shutoff valve behind and below the toilet on the wall. Turn it clockwise until it stops. If the valve is stuck (common in older homes), apply a bit of penetrating oil and try again gently. Never force it — a cracked shutoff valve is a much bigger problem.
- Flush the toilet to drain the tank as much as possible. Use your sponge and bucket to remove any remaining water.
- Disconnect the old flapper. The flapper hooks onto two pegs on either side of the flush valve seat (the drain opening at the tank bottom). Unhook both sides. Disconnect the chain from the flush handle arm.
- Inspect the flush valve seat. Run your finger around the circular rim where the flapper seats. If you feel mineral deposits, ridges, or cracks, clean it with white vinegar and a scrubbing pad. If it’s deeply damaged, you may need a flush valve replacement (see advanced repairs below).
- Install the new flapper. Hook the new flapper’s ears onto the pegs on both sides. Attach the chain to the handle arm, leaving about ½ inch of slack — too tight and the flapper won’t seal; too loose and it may not open fully during a flush.
- Turn the water back on and let the tank fill. Test by flushing several times. Repeat the dye test after 10 minutes to confirm the fix.
Repair 2: Adjusting or Replacing the Fill Valve
If your diagnosis pointed to the fill valve or high water level, here’s your repair path.
Adjusting Water Level First
Before replacing the fill valve, try adjusting the water level. On modern fill valves (cup float style), there’s typically a screw or clip on the side of the valve body. Turn the adjustment screw counterclockwise (or slide the clip downward) to lower the water level. The target water level should be approximately 1 inch below the top of the overflow tube. On older ballcock systems with a ball float, gently bend the float arm downward to lower the shutoff point.
Replacing the Fill Valve (Full Replacement)
- Shut off the water supply and flush to drain the tank. Remove remaining water with a sponge.
- Disconnect the water supply line from the bottom of the tank using your adjustable wrench. Have a towel ready — some water will spill.
- Remove the old fill valve. Inside the tank, hold the valve body steady while unscrewing the plastic locknut on the underside of the tank. Lift the old valve out.
- Prepare the new valve. The Fluidmaster 400A (or equivalent) is height-adjustable. Set the height so the critical level mark (usually marked “CL” on the valve) is at least 1 inch above the overflow tube. Lock the height in place by twisting the top of the valve.
- Install the new valve. Insert the shank through the tank hole. Hand-tighten the locknut from below — add a quarter turn with your wrench. Do not overtighten; you’ll crack the tank.
- Attach the refill tube. This small flexible tube connects from the top of the fill valve to the overflow tube. Clip or insert it into the overflow tube — this is what refills the bowl after a flush.
- Reconnect the water supply line. Turn the water on slowly and check for leaks at the base of the valve. Adjust the water level using the adjustment screw, and confirm the valve shuts off cleanly when the tank is full.
Case Study: James, a homeowner in Seattle, had been dealing with a hissing toilet for over a year. He’d replaced the flapper twice, but the sound persisted. Finally, in January 2026, he diagnosed the issue as a faulty fill valve using the diagnostic process above. A $14 replacement valve and 25 minutes later, the problem was completely resolved — and his January water bill was $38 lower than the previous year’s January bill.
Common Challenges and How to Overcome Them
Even a straightforward repair can hit unexpected obstacles. Here’s how to handle the three most frequent problems DIYers encounter.
Challenge 1: The Shutoff Valve Won’t Turn
In homes built before 2000, the toilet shutoff valve (also called the angle stop) may not have been operated in years. Corrosion and mineral buildup can seize the stem. Do not force it with excessive pressure — you risk snapping the stem or cracking the valve body, which means water everywhere and an emergency call to a plumber.
Solution: Apply a penetrating lubricant like WD-40 or PB Blaster to the valve stem. Wait 10 minutes and try again gently. If it still won’t budge, turn off the main house water supply valve instead (usually in the basement, utility room, or outside near the meter), complete your repair, then have a plumber replace the faulty shutoff valve while the main is off.
Challenge 2: The New Flapper Still Leaks
You’ve replaced the flapper, but the dye test still shows color in the bowl. This typically means one of two things: either the flush valve seat is damaged (pitted, cracked, or warped from hard water deposits), or you purchased the wrong size flapper.
Solution: First, re-examine your flapper size. Standard flappers work on most toilets, but some brands (notably American Standard and Toto) use proprietary sizes. Check the manufacturer stamp inside your tank. If the seat is damaged, a seat repair kit (like the Fluidmaster PerforMAX, around $8) applies a new rubber ring directly over the damaged seat — no need to replace the entire flush valve assembly.
Challenge 3: Tank Keeps Running After All Repairs
You’ve replaced the flapper and the fill valve, adjusted the float — and the toilet is still running. At this point, the issue may be a cracked overflow tube or a problem with the flush handle mechanism causing the chain to be perpetually slightly taut.
Solution: Check the chain length first. A chain that’s even slightly too short will hold the flapper off its seat constantly. Adjust by reconnecting it one or two links higher on the handle arm. If the overflow tube is cracked (rare but it happens in older toilets), a full flush valve assembly replacement is needed — about a $15 part and a slightly longer repair, but still firmly within DIY territory.
Prevention: Keeping Your Toilet Running Smoothly
Now that your toilet is fixed, a few maintenance habits will prevent the problem from recurring for years.
DIY Toilet Maintenance Impact (Estimated Frequency of Issues Avoided)
Practical Prevention Tips
- Inspect tank components annually. Lift the lid once a year, look for discoloration, wear on the flapper edges, and confirm the water level is correct.
- Avoid drop-in chlorine tank tablets. These are extremely damaging to rubber flappers, degrading them in as little as 6 months. Use bowl-clip style cleaners instead.
- Replace flappers proactively every 3–5 years, especially in areas with hard water. At $6–$10, it’s cheap insurance.
- Check for silent leaks monthly with a quick dye test — a habit that takes two minutes and can catch a slow leak before it becomes a bigger bill.
- Know your toilet’s brand and model. Write it on a piece of tape inside the tank lid for quick reference when purchasing parts.
Frequently Asked Questions
How long does it take to fix a running toilet if I’ve never done it before?
Most first-time DIYers complete a flapper replacement in 15–30 minutes from start to finish, including the diagnostic step. A full fill valve replacement may take 45–60 minutes the first time. The most time-consuming part is usually a trip to the hardware store, not the repair itself. Give yourself a couple of hours the first time so you don’t feel rushed — and keep this guide handy on your phone while you work.
Is it safe to use my toilet while it’s running?
Yes, a running toilet is generally safe to use — it won’t overflow, cause sewage backup, or create a health hazard in most cases. The risk is purely financial and environmental: wasted water. That said, if your toilet is running because of a cracked tank or overflow issues where water is visibly dripping outside the tank or onto the floor, stop using it until the issue is resolved and inspect for water damage beneath and around the toilet base.
When should I stop DIYing and call a plumber?
Call a professional plumber if: the toilet tank is visibly cracked; water is seeping from the base of the toilet (a wax ring failure, not a tank issue); the shutoff valve cannot be operated; or you’ve replaced all internal components and the problem persists. In 2026, licensed plumbers typically charge $85–$130/hour in most U.S. cities — a cost well worth it for issues involving the toilet’s structural integrity or supply line connections inside the wall.
Your Toilet Fix Checklist: Time to Take Action
You’ve now got everything you need to diagnose, repair, and prevent the most common running toilet issues — all without waiting for a plumber or draining your savings account. Let’s bring it together into a clear action plan.
Your Immediate Implementation Checklist
- ✅ Step 1: Remove the tank lid today and spend 5 minutes observing water levels and listening for hissing.
- ✅ Step 2: Perform the dye test to confirm whether the flapper is leaking.
- ✅ Step 3: Purchase the appropriate part (flapper, fill valve, or both) — budget $10–$25 maximum.
- ✅ Step 4: Complete your repair using this guide, confirming success with a second dye test.
- ✅ Step 5: Set a calendar reminder to inspect your toilet annually and replace the flapper proactively every 3–5 years.
In 2026, smart home water monitoring devices are increasingly affordable — systems like the Moen Flo or Phyn Plus (starting around $150) can now detect toilet leaks automatically and send alerts to your smartphone. If you have multiple toilets in a larger home, pairing your DIY maintenance skills with smart monitoring technology represents the next evolution of home water management.
Here’s the bottom line: every running toilet you fix is money back in your pocket, water conserved for a resource-stressed world, and one more skill added to your homeownership toolkit. The satisfaction of fixing something yourself — and watching that next water bill drop — is genuinely worth the 30 minutes of effort.
So here’s a question worth sitting with: How many small, fixable home maintenance issues are quietly costing you money right now — simply because no one ever showed you how to address them? This toilet fix might just be the start of something bigger.